Wednesday, December 28, 2011

French Country Bread


Our Daring Bakers Host for December 2011 was Jessica of My Recipe Project and she showed us how fun it is to create sourdough bread in our own kitchens! She provided us with sourdough recipes from Bread Matters by Andrew Whitley as well as delicious recipes to use our sourdough bread in from Tonia George’s Things on Toast and Canteen’s Great British Food!

Daring Bakers is part of food bloggers/food photographers online obsession.  This particular component includes a monthly baking challenge.  Each month a different host presents the bakers with a recipe and some specific instructions – like “you must hand churn the butter” or “you cannot substitute the flour/nuts unless there is an allergy or it is unavailable in your area.”  They are challenges though, because sometimes it is hard to find the ingredients or they include a baking technique you’ve never tried before…or like this month, they take hour and hours to complete. What I really love about the challenges is a.) some great baker has perfected their recipe and put hundreds of hours of research and testing into it, b.) they share a lifetime of knowledge and explain to you all of the nerdy tips you need to make it perfect, and c.) you always learn something that impresses.

 My sourdough sponge was super easy to start and now that I see how easy and great (and impressive) the bread was, I wonder why I haven’t been doing this for years!  In fact, my third loaf is rising in the kitchen as we speak.  I can’t wait to get home and pop that beautiful bundle of flour, salt and water into the oven.

It is such a perplexing combination of simple and complex.  The ingredients couldn’t be simpler:  flour, water and salt.  And time.  Lots of time.  Easy to see how it became a staple in our diets.  But it is soo complex!  I’ll admit I don’t fully understand how I went from a bowl of wet flour to the beautiful and delicious bread on my table.  You put together these simple ingredients and wait…and wait…and when you come back you have a yeast smelling spongy concoction!  It grows so beautiful and full and really becomes a blob you can be proud of. 

My favorite moment in making this…well there were a few…like kneading the wet sticky dough without flouring the surface.  It was just messy fun.  But my favorite moment was when I made the first slice into the warm bread.  I cut through the crunchy top and found the center nice and soft.  As the heel came free and fell to the side, steam rose up inside the bread and the inside revealed nice big pockets from air bubbles (like in Swiss cheese).  The top of the bread was perfectly cracked and powdered and looked like something from a European bakery.  It was so delicious and so impressive – I can’t wait to get home to put that third loaf in!
The dough was so sticky the spatula stuck to my hand!

Tuesday, December 13, 2011

Pfeffernusse


Every Christmas my grandma would send us a box full of pfeffernusse (pepper nuts) a small hard German Christmas cookie.  I'm always hesitant to tell people they are anise cookies because the general public seems to think they hate anise because of the bad rep of black licorice.  I have news for you people:  the flavor you hate in black licorice is the same flavor you love in Italian sausage!


Back to grandma's pfeffernusse.  When she died we all wanted to make sure we had this recipe which was by far her most famous.  Though I've had the recipe for 2 years, this is the first that I've attempted the cookies and the recipe was a bit of a challenge, to say the least.

Lets start out with the lard.  Obviously this is an old recipe.  Guessing by my grandma's age and the dates on the other cookbooks I have from her, I'd say the version I have is from the 1930s.  I don't have access to lard, and even if I did I'm not sure I would want to cook with it, so I used butter.  Actually, someday it would be great to try these with lard just for the heck of it.

Brown sugar or 1/2 and 1/2 white sugar...I think I know what you mean.  1 cup syrup or 1/2 cup molasses...umm...I know these are different, but wouldn't the different quantities and viscosity dramatically effect the baking times and final product?  This seems like a lot of guessing for a first attempt.

And then was the kicker..."Enough flour to roll."  Well thanks, Grandma.  I seem to have misplaced my "enough" measuring cup.  Is that closer to 1 cup or 4 cups?  And exactly how many cookies am I making?  (The answer is closer to 4 cups.)

There was also no guidance on HOW to make the cookies.  It was more of an ingredient list than a recipe. Which I get, that is how I write my favorite recipes too.  But it isn't so helpful for the first time.  So I guessed...wrong.  I started over.  I tried a first batch (which are more like cookies than pfeffernuss).  And then I think I got it down.  Tricky little devils though - they look like they aren't done, but they are hard as a rock.  And according to the internet (and I think confirmed by my memory of grandma's version) they actually soften over time.  Lets hope so!

Recipe Details
From the above recipe, use butter in place of lard and use all brown sugar.  I halved the recipe and used about 3-4 cups of flour (you should probably have a whole bag on hand).  "Enough to roll" means that you stir in enough flour to make the dough thick enough to roll out like gnocci (or play dough).  Oh, and I took sour milk to mean buttermilk.

First, beat the butter and sugar until it is soft and all of the sugar is incorporated (I just love doing this).  In a small bowl combine the buttermilk and syrup.  Add syrup/milk mixture to the butter in two or three batches, making sure it is fully combined.  In another bowl mix together the spices and the baking soda with about 3 cups of flour.  Add the dry ingredients to the wet in two or three parts.  Once the dry ingredients are fully mixed in continue to add flour 1/4 cup at a time until the dough is thick (like play dough).

On a floured surface (I love this part too!) roll out a piece of dough into a rope that is about as thick as your thumb.  Using a butter knife cut the rope into pieces about 1/2 to one inch wide.  Place the pieces on a cookie sheet and bake at 375 for 8-10 minutes. 

Wednesday, November 2, 2011

Pan de Muertos

Feliz Dia de los Muertos! 

In high school my favorite class was Spanish.  Probably because my teacher was great and used things like music and food to get us interested in class.  On a couple of occasions she asked us all to make a Spanish/Latin American dish to bring in for the class.

Someone in our class brought Dead Bread, or Pan de Muertos.  I'd like to say it was me and that I made it...but that probably is my literary take and far from the truth.

Pan de Muerto is a soft sweet orange bread.  It is something like challah bread meets brioche meets freshly sweet oranges.  It is so delicious! 

The basic recipe is here.  Check on it frequently and take it out a bit earlier - it is best when it is soft and moist!  Yumm!  You'll wish you'd celebrated every Dia de los Muertos!

Paul's Ossobucco - New Favorite!

I'm smiling just thinking about the delicious ossobucco my husband made for me last night.  It all started when I saw this delicious recipe I saw for Braised Short Ribs with Ancho-Chili Spiced Syrah Reduction that I saw last week.  Ahh..it looked so good and the sauce ancho-chili syrah - does that not sound AMAZING!  So after a few days of drooling I set out to get all the fixin's.  

I live in Israel right now, and don't speak Hebrew.  The meat counter/butcher is one of the more intimidating places to go.  So I did my research and found out what short ribs looks like and set off to the shi-shi grocery store which has the best meat.  And they didn't have any ribs.  Dang it.  I circled the store for about 20 minutes waiting for google translate to load on my phone, and then I confirmed for my self that they in fact had no ribs in the deli nor in the freeze. Dang it!  Okay...I'll just do another great meat with the sauce....that one please.
Another 20 minutes on the computer when I got home revealed that I was the proud owner of $22 worth of ossobucco (which isn't that much in Israel).  Ossobucco takes cooks for about 4 hours so we were not going to have that for dinner.  Luckily (well...kind of) Paul was sick the next day, freeing up his afternoon to make a delicious dinner!

The recipe I found at Eats Well With Others (such a creative name!) sold me.  " It is lemony and caper-y and you will squeal the entire day while it is cooking in your kitchen."  Ahhhhahaha! When I came home from work I opened the door, smelled the delicious ossobucco in the oven, and squealed like a giddy foodie! 

It tasted every bit as amazing as it smelled and sounded.  In fact, it was the best meal that I can remember.  This is the type of stuff that you order at a restaurant and then go back every chance possible.  The best part about having this delicious meal at home is that, when no one is looking, you can lick the plate!

Tuesday, November 1, 2011

Smushed Cheesy Toast

Its lunchtime here in Israel, and though it isn't a rainy day and there is no sign of what I know to be fall, I really wanted one of these squishy cheesy toasts.  I don't know what it is really called, but the Americans I know (who don't speak Hebrew) refer to it as the smushed sandwich, the Israeli's refer to it as a cheese sandwich and I think the women who makes it calls it toast.  So - smushed cheesy toast it is.


The woman who sells these speaks not a word of English, though I think she understands a lot.  Or she is a good guesser.  She greets me in Hebrew and (I think) asks me what I'd like.  I say "toast with onion" and point at the bin of bagels...and expressionlessly she grabs an onion bagel. How did she do that? There are lots of kinds of bagels in there! Then she asks me (I think) in Hebrew what I'd like on it.  Now I respond in half Hebrew, half English: "Cheese, agvaniot, pitriot, pesto sauce, that one...yiroque..yes!"  Sometimes I'm not sure if I said green or blue - or if the word in Hebrew even uses the color - but she still gives me the green onions. 

Once I've exhausted my Hebrew words and the options at her salad bar, she closed the bagel and places in a sandwich/panini maker.  And i wait....and wait....and wait.  It takes quite a while.  Usually while I'm waiting I try desperately to remember the Hebrew word for sauce.  I listen to other people order, hoping they say it.  I know what it is, I just can't remember.  It doesn't matter, because I remember the word "shum" and the only garlic thing she has is the delicious sauce. 

After about a 10 minutes wait, this delicious crunchy, gewy, smushed, cheesy toast is mine.  The toast is nice and firm and crunchy and contrast very well with the stringy cheese inside.  Some of the veggies are crunchy and some are warm and mushy (and when your Israeli colleagues order for you, you get an extra juicy crunch in the corn).

This women should expand.  Her delicious squishy cheesy toast is only US$5.  I wish I could save half for later (because it is kind of big and if you put a lot of veggies like me it is very filling) - but of course, I end up eating the other half "while its warm."  It would be the perfect rainy-day lunch...if it ever rained.  Alas, here is to smushed cheese toasts on a not-so-rainy day!

Sunday, September 18, 2011

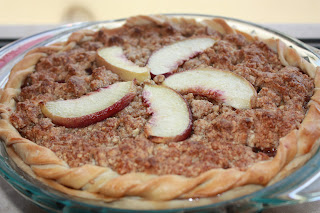
Perfectly Picturesque Peach Pie :)


Paul wanted to put the pie in the window. I wanted to drive the neighbors nuts with the great smell.
The blogosphere has been abuzz with peaches lately.  Peach cobbler, grilled peaches, peach smoothies, fresh stuffed peaches, peach cake…Mmmm!  I don’t live in the States right now but I know how delicious those peaches are and I want you to know how jealous I am.  My husband and I really can’t eat a whole peach pie right now, so I convinced a friend to host a potluck, promising him a delicious and stunning peach pie.  I didn’t have a recipe.

I bit the bullet and bought those expensive imported peaches that are not quite ripe…but it is the best I can get.  So I’ll have to hope my baking skills can make up for it.  As for the recipe, I spent a wonderful moment perusing some great food blogs for ideas.  I decided to go with something akin to my mom’s Dutch apple pie with the beautiful presentation of SassyKitchen, but I couldn’t use her recipe so I was still at square one.  The flavor combinations of Pease Pudding sparked my interest:  Nectarine & Cardamon Ice Cream.  Mmmm…cardamom; Fitting given its prominent role in Arab foods (Arabic coffee) and my current location in the Arab world.  A nice local touch.  Finally, I thought I’d change up the streusel topping by using almonds (thanks to Carina Forum for the idea).

Here is the recipe (email me if you’d like it in cups instead of ounces):

Crust:
2.7 oz butter
5 oz all purpose flour
½ tsp salt
3+ tbsp cold water
1 egg white (used later)

Dice up the butter into cubes/pads and drop it into the food processor.  Add the flour and salt and pulse until you have small pieces (not too long or you’ll have one big blob).  Pour in the cold water, 1 tbsp at a time, pulsing in between tbsps.  Add more water until the dough is moist and sticks together.  Roll out a piece of saran wrap and place the dough in the center.  Knead the dough slightly to make sure you don’t have chunks of butter.  Refrigerate for 30 minutes.
 
Filling:
4-5 delicious and fresh peaches!
8 oz. sugar
1.25 oz all purpose flour
½ tsp cinnamon
½ tsp nutmeg
½ tsp cardamom
Splash of lemon juice

Slice the peaches and put them in a large mixing bowl.  In a separate bowl, combine the sugar, flour, and spices.  (If you want to go the extra mile, grate your own cinnamon, nutmeg and cardamom!)  Sprinkle the dry mixture over the peaches and toss.  My peaches were pretty dry and the mixture mostly fell to the bottom of the bowl.  But, the sugar will pull out the juices in the peaches to create a syrup so you should stir this a few times to re-coat the peaches.  I added a splash of lemon juice a.) because my peaches were dry and b.) because I wanted something bright amidst the warm winter flavors.
 
Topping
2.5 oz all purpose flour
2.5 oz almonds
4 oz butter
4 oz brown sugar

Using a food grinder (like a coffee bean grinder), coarsely grind the almonds into a powder.  Combine the almond, flour and sugar in a food processor.  Add the butter in cubes/pads.  Pulse until small balls appear.  (If you blend too much on this one, don’t worry.  Your fingers will just do little more work breaking it into pieces when you put it on the pie.)

Okay – so now you have all of the pieces ready.   

1.  Roll out your pie crust, fold it into quarters and transfer to the pie pan.  Trim the edges right at the top of the pie dish – don’t eat them.  (If you can, blind bake the crust for 10 minutes.)   

2.  Roll the extra edges into a ball and roll it out again into an oval.  Cut this into long strips about ¼ inch thick.  Twist two strips together and repeat until you have enough ribbon to go around the circumference of the pie.  (If you were blind baking the crust, pull it out of the oven!)  

3.  Stir your peaches one last time and pour them into the crust, drizzling any extra syrup over the peaches.  Reserve 5 perfectly cut beautifully colored slices for the top the pie.   

Pre-baked.
4.  Using your fingertips break the topping into small pieces and spread it evenly on top of the peaches (don’t get too close to the edge).   

5.  Now carefully wrap your dough-ribbon around the edge of the pie, hiding the ends as best possible.  Arrange your final peach slices on top and brush the ribbon with egg whites.

6.  Finally, cover your masterpiece with foil and bake.

Bake at 400F for about 30-35 minutes.  Remove the foil and bake for another 10-15 minutes until the crust and topping are beautiful golden brown.  Resist the temptation to eat the hot pie and let it cool – the syrup will congeal and it will look so beautiful when you cut into it!
 The pie is very warm and not too sweet.  I recommend you serve it with some vanilla ice cream.  The cool rich flavors of the ice cream will balance well with the warm fruity flavors of the pie.  

Golden Crust.


Tuesday, September 13, 2011

Happy BIrthday Katie! (ie. Delicious Cupcake Occassion!)

It was quite the challenge to make Katie's birthday cupcakes.  She is a cupcake connoisseur.  We're a perfect match :)  I love to make them and she loves to eat them (and give me great feedback!).  So for her birthday, I really wanted to make something especially delicious.  The challenge, make her favorite cupcake - Georgetown Cupcake's  Vanilla².  I've never had this cupcake before (and I didn't look up that website until just now), but I definitely succeeded.


I started with the most delicious richest creamiest vanilla recipe I know:  Warren Brown's yellow butter cake.  (Warren Brown is a D.C. chef and a food star...he was making cupcakes before Georgetown cupcake even existed!  He is pretty a big deal.)  I won't say I modified his recipe (it is pretty great) but I did use two specific ingredients he didn't mention.  First, I used this amazing butter I buy from "my cheese guy" in the market.  Second, I used our best vanilla - a pure bourbon vanilla.  (Little did I know that Georgetown Cupcakes also uses a bourbon vanilla!)

I went with a vanilla cream cheese frosting.  (I didn't use a recipe!, but if you'd like one you can check out Georgetown Cupcake's.)  Okay, I will tell you that mine is different because a.) the portions are off (I just eyeball it) and b.) after I've added the maximum amount of powdered sugar the butter/cream cheese can handle, I mix in a splash of heavy cream.  This makes the frosting really fluffy.

For Katie's Birthday I made a green-teal frosting and decorated the large cupcakes with swirls and the small ones with stars.  Then, because I've been dying to use my cute little pearls and because Katie's birthday is worthy of my favorite decoration, I delicately added the cute little balls.  In the car on the way to work this morning I was so excited to give Katie her cupcakes!  Me:  They look like something you would eat at a baby shower or an engagement party! Paul:  You mean wearing a dress and pearls?  Me:  Exactly!!!  


Perfectly Poached

I can't order poached eggs in a restaurant any more.  How do professional chefs eat out?  Now that I know how to poach a damn good egg, I can't order it in a restaurant.  Not like seeing the making of your fast food makes you not want to eat it, but how after spending a weekend in a 5 star hotel you just can't swallow the Super 8.

Now that I understand the art (skills, technique, the precise care) that has to go into making a great poached egg - I just can't order it in a restaurant.  The first one was overcooked and my yolk didn't run. And the egg whites weren't fluffy and playful in my mouth, they were thin rubbery pieces.  The second egg was at a much nicer restaurant and they kept the yolk somewhat....not completely solid.  But the whites were nicely structured in a contained circle and pretty fluffy.  The problem - instead of poaching the egg with all the love and tenderness and attention it demands, they trimmed off the imperfections.  I could tell because they most definitely would have used a Large egg and what was on my plate was the size of a Reese's cup.  Seeing my excitement when ordering and my disappointment (almost disgust) with the quality of the expensive eggs I was served, Paul set his foot down:  No more ordering poached eggs.

So, poaching a great egg isn't rocket science, but it isn't the simplest thing in the world either.  You have to start with a basic understanding of what you are working with (and against), and then you have to play the game really well.  The latter is what makes you a chef.  Sadly, what most are missing is the former - and that is where I come in!

The Water  The water in your pan should just barely cover the egg once it is dropped in.  So this amount will vary depending on the pan, the size of the eggs, etc. so I can't tell you "2 cups."  It should probably be about 2 inches of water.  Many say to add vinegar, which supposedly is the magic wand for amateurs. The vinegar supposedly helps the whites to coagulate, or pull themselves together so they cook faster meaning, so you have more solid fluffy whites instead of the runny kind.  (I don't think the vinegar really helps.  You can screw up royally with it or do a perfect egg without it.)


Hot and still water is super important.  Too hot and the egg breaks apart and too col and it doesn't really cook (and it spreads out).  The water should be just below a simmer.  I'd get the exact temperature for you, but you probably wouldn't use a thermometer anyway - and you don't have to.  The best way to describe this:  If you watch the water heat up you'll notice that lots of small bubbles appear to be stuck to the bottom of the pan.  If they have enough strength to float to the top of the pan, you water is too hot.  You could also put it just below this temperature by turning the stove down a bit or stirring the water.  Cuidado!  Julia Child tells you to stir the water to cool it down before dropping in the egg.  And that is how I learned to make egg drop soup!  The water has to be still.  If the water is moving (waves, current, bubbles) your egg whites will go along for the ride and your egg won't stay together.

The Egg  This is a little nerdy and foodie-ish.  Eggs are very complex and amazing.  First - the color. 
Every once in a while you crack open an egg and the yolk is BRIGHT YELLOW!  Other times it is very pale. Why the color difference?  What does it mean?  It has to do with what the chicken ate. (In the U.S. the feed is pretty consistent so they are usually always the same color, but in Israel they vary greatly!)  I like the bright ones for the color they bring to a dish and because I think they are more rich and creamier (and supposedly there are many more vitamins).  You shouldn't worry too much about the color though.

This egg was slightly older and spread out in the pan.
So when you crack open a fresh egg the whites are very thick and kind of form a blog if you poured it on the counter.  If you start to tip the cracked egg to the side the whole egg follow - like cars on a roller coaster being pulled over the climax.  As an egg ages (we're talking days) the whites get weaker and start to separate.  When you crack open this egg it is more runny and some of the white may drip freely from the egg.  You want fresh eggs (or again, you will be having egg drop soup for breakfast).  This will be really important when you first drop the egg into the water: (assuming you have hot still water) the fresh egg will hold itself together while the old eggs will spread out in the pan like pancake batter.  (Pictured right is an older egg.)

(Left)  See the large white circle around the yolk?  That is the fresh egg white which stuck together and tenderly protected the yolk as it was cooked.  These thick whites will be fluffy and delicious!  The blurry white above that are parts of the white which started to break down, they are weaker and so when I put the egg in they started to float away.  These whites will taste drier and slightly rubbery.

The Poaching Part  First, following the directions above, your eggs should be a room temperature and your water hot and still.  Carefully crack the egg into a small dish.  You do this a.) so that you don't get egg shells in your water and b.) so that you can slowly lower the egg into the water.  Double check the water temperature - if it is too hot you can a.) turn down the temperature and wait or b.) speed up the cooling by stirring the water.  (Julia Child suggests the latter - but be careful to let the water fully settle before putting in the egg or...you know...egg drop soup.)

Lower the dish so that the lip is touching the water and slowly let the egg slide into the pan.  If you whites are thick enough, you can let the first half slide into the pan, wait 3-5 seconds for it to start to turn white, and then slowly let the yolk fall on top.

Don't stick your pretty little spoon into the water and cause waves.  Don't let bubbles start to come up.  Watch like a hawk (at least until you have a good grasp on how long this takes).  When the bottom of the egg is white (solid), use a plastic or wooden spoon to carefully edge the egg off of the bottom of the pan.  The top should still be uncooked and the yolk is still very soft.

Once all of the whites have...well..turned white, carefully scoop the egg out with a slotted spoon.  Gently tip the egg to and fro to allow as much excess water to drip off as possible.  If you want to make your egg look extra fancy, you can set the egg on a cutting board and trim the edges (see below).

After you have mastered the poached egg (no more egg drop soup and no more rubbery pieces in murky water), try getting the perfect yolk:  a thick runny yolk that just coats your fork (or bread).  Mmmm!
Starting with a decently poached egg, most restaurants will trim off the not-so-perfect white edges.  I think this is waste of good eggs, above is the simple trick.

Wednesday, July 6, 2011

Sweet Farewells

We bid farewell to 3 wonderful colleagues at work.  They are all really fun people and deserved only the best farewell.  So..logically...I was commissioned to bake the cakes!  Yeah!!

Happy Customers Devour My Cakes!
The cake menu included two new specials as well as two of my favorites!  Actually, they are all so delicious I can't say which is my favorite!!!  It was a great challenge to bake 4 cakes after work, while still getting enough sleep to function at work and being able to deliver delicious fresh cakes!  But really, the bigger challenge was the transportation of the cakes!  I only have one cake carrying case and one of the cakes was too big to fit in the case anyway.  My solution:  Clean EVERYTHING out of the fridge so no flavors spoil the cakes, turn the air on full blast in the car, and recruit friends to hold the cakes on the way there :)  It worked!

Chocolate, Chocolate, Yum!
Chocolate Chocolate Yum - I'm still working on names :)  but I don't know what else to call this one.  It is the most decadent chocolate deliciousness!  When you put the first bite in your mouth a great rich chocolate flavor sweeps over you.  The cake is moist and somehow light and melts on your tongue.  Before you know it, the bite is gone!  A chocolate cake is layered and topped with a light (in texture) whipped chocolate ganache frosting and sprinkled with beautiful and playful dark chocolate shavings!  Chocolate...more chocolate...and Yum!
 
Dulce de Leche
Yellow Butter Cake with Dulce de Leche Frosting - So cake two is a take on my cake role model's recipe (Warren Brown of Cake Love in D.C.).  The cake is creamy and hearty (fully of love, and slightly heavy).  The simple flavors of the eggs, butter, and sugar shine without the fuss and vanity of other flavors.  But the real love is in the frosting.  Oh my gosh.  I didn't milk the cow or harvest the sugar cane, but I did MAKE the dulce de leche (thanks for the recipe mom!) and then I beat the butter into submission and delicately folded it all together.  I could eat this whole cake.

JC's Orange Sponge Cake - If I had a signature cake, this is it.  I love it!  I won't ever say my cakes are healthy - they are treats or splurges to be enjoyed in moderation.  To do them justice, I only use the best ingredients..which means real butter, real cream, real sugar, real fruit - real food.  So this cake is healthier because it has fruit (haha), less sugar, and less flour.  The texture is light, the flavor is fresh.  The butter cream frosting (which is usually spiked with Cointreau) hints at something special and sophisticated. And the orange slice is a great final bite to cleanse your pallet.

Sweet Margarita!
Sweet Margarita - This final cake (which I was most excited about) is similar to the Orange Sponge Cake.  I was exceptionally excited about this one because limes are only available about one week a year in Israel - and this was the week!!!  So I made a lime sponge cake which is just a light and fresh as the orange one, but slightly more sour.  To mimic the salt rim on a margarita I added just a touch more salt (which also intensified the flavors!).  I frosted the cake in a lime butter cream frosting with just a hint of orange (to mimic the Cointreau or Triple Sec in a margarita).  Finally, I topped the cake off with a deliciously sinful lime curd.  A curd is basically eggs, butter and lots of sugar boiled down (the sweetest part of the cake condensed into a jelly-like syrup, sans the flour).  Like a rum cake - I would recommend pouring a bit of tequila over the cake after it has cooled, before you frost it.  Of course, I didn't follow my own recommendation (and probably wouldn't).  Instead, I let the lucky cake eater choose to either chase their cake with a shot of tequila (and then the slice of lime), or chase the tequila with a slice of lime cake (instead of a lime)!  It was a huge hit!  If only we had limes, I'd make it again!!!

Sunday, June 12, 2011

Framing the First 100 Shekels

You know how you always see $1 bills framed in restaurants and such, representing the first dollar the business owned?  Well...I'm ready to frame my first...100 shekels :) 

I can't say I wasn't thinking of selling cakes, that would be a total lie.  I even went so far as to try to come up with a name for the bakery and collected menus to get ideas for the popular flavors.  But - that was a distant distant daydream.  Until last week.

I had a minor cake crisis last week making a cake for a party when I whisked up my eggs and delicately folded the whole thing together...only to find my oven was still cold.  I asked the host to pre-heat her oven and jumped in the car.  It is about 85-90* out, so the cake...pre-baked....on the way.  I frosted the cake at the party when I arrived (fashionably late) and thought it would be a total disaster...but no.  Instead, a colleague asked if I could make a cake for his birthday.                   AND HE WOULD PAY ME!

I modestly tell him the cost of the ingredients (which is not so cheap in Israel, especially since the State just upped the price of butter!) and he doubles it!  My first cake sold for roughly $30!

But wait...it gets better!!! He and his colleagues were so impressed by my cake (which they ate a day later, so it was a little too dry) that they want to buy "a couple" of cakes from me for a farewell event!  HA!!!  This is taking off much faster than I thought.  My audience will be about 140 people, roughly 30 of which are Americans (so who know cakes) and the rest Israelis and Palestinians (who don't know great cakes)!  Oh, if only all the Israelis and Palestinians could come together around my cakes :)  Hahaha. 

Anyway, it will be quite the challenge in terms of timing (a much bigger scale than I've done before) and in terms of it being a PICNIC!  I'm picturing the frosting just sliding right off the precious little dessert.  Maybe I'll have them slightly frozen..oh then there will be water droplets.  There is also the dilemma of having only one cake carrying case.  Boxes?  Cake platters with plastic bowls taped on top ($5 a bowl)?  If anyone is up for the challenge..it is me! 

Monday, May 23, 2011

S'mores! MMmmmMM!

This past weekend was Lag B'Omer in Israel and despite reading the wikipedia page and asking several friends about it - I have no clue what the holiday celebrates.  All I really know is that they have bon fires and the place to be is right in front of my house.  Last year we were surprised by the wonderful our balcony provided of the festivities; so this year, we invited our friends over to "Observe" the holiday with us.

The odd thing about this Israeli holiday is that they make tepees out of their cardboard and trash and pallets, then light it all on fire, and watch for about 15 minutes as the thing flames.  They usually have a blanket or small table set up with food, and a few select (orthodox) groups will bring music.  Being American I had to put my own touch on things...so I decided we'd have S'mores!

This wouldn't seem like anything too extraordinary but there were actually two friends who had never had them before - so for them it was their best S'more ever. Well..their best 2 S'mores ever because you really honestly couldn't have eaten just one of these.

The other extraordinary thing was there are no graham crackers here!  Shocking!  They have a cookie that is close - but not good enough.  So I....look up a recipe to make graham crackers from scratch.  Didn't look too difficult but it called for brown sugar (which thank god I'd just gotten in a care package from my dad!) and honey which I didn't have - ironically.  What I did have (from the same care package) was maple syrup.  Oh my husband would kill me if he knew I used his maple syrup to make these cookies!  Final ingredient - AMERICAN marshmallows.  They are flavored here...like strawberry and some other crappy taste.  A friend tried the whole "Israeli S'mores with their pseudo graham crackers and flavored marshmallows" - you can find her picture on failblog.

Anyway, the making of the graham cracker was a bit tricky because the recipe said to cook until they were slightly brown - but they were brown to begin with because of the brown sugar and the maple syrup.  The first round (or two) came out a little crunchy.  The later ones were better.  In the end, the dark and light ones looked good together and magically, in the 4 hours between when I tried the first one and when we served them - they got better!

I'd like to tell you that I don't want to brag...but I do.  They were freakin' amazing!  One friend (a foodie!) said they were the best S'Mores he'd ever had in his life!  (No - this wasn't his first.  He is American.)  I put all of the ingredients in a cute little stand (and practiced my food photography skills).

I would have taken more photos of the roasting of the marshmallows or the finished products or friends enjoying them...but my hands were sticky!  This was the only photo I managed to take before devouring this cookie...and making another.

Friday, May 20, 2011

Amazing Books I Should Own

In spite of my dislike for the low quality of subject of the amazing photos on foodgawker.com, they have led me to some interesting food blogs which have led me to some interesting foodie books on Amazon, which have led me to more interesting books!  One of which is Fat: An Appreciation of a Misunderstood Ingredient, with Recipes by Jennifer McLagan.


First, I love this book because it is just enough of the food science to validate the author's points.  (By food science, I'm referring to her description of butter, not to the references to specific vitamins and proteins which, agreeing with Michael Polan, I do not agree with.)  Second, I love her defense of butter and am curious now to experiment with lard - although my husband would hate that.  Third, great photos, a necessity in the realm where you can't smell or taste the food. Finally, history and culture.  This really falls in line with Michael Polan's In Defense of Food, taking his points even further.


I should own this book.

"Food" Blogs

In the past week I've made an interesting revelation about "food" blogs and the amazing mouth-watering website foodgawker.com.  Here it is, the sad truth:  To be a great food blogger, you just have to be a great food photographer.  That is really all there is to it.  The proof of this is that in my estimation about 1/3 of the posts on foodgawker are not of good food or from artist chefs.  I mistakenly thought it was a great resource which compiled the best of the armature chefs.  (Oh...maybe I should create THAT site!)

Anyway, it was a sad revelation to see cheap products in good photos or no recipe attached to the photo.  But, I have to cut them some slack because Food Network does it too.  I was watching a Thanksgiving Day special a few years ago and the celebrity chef put a dash of salt into his dish.  The other chefs laughed and pointed out to him that he had mistakenly used the sugar and not the salt.  They all laughed and noted that "it just has to look good - no one is really going to eat this."  Hmm...

At least they've led me to several good food blogs.  And they do have delicious photos!

Monday, May 16, 2011

Personalized Fortune Cookies


It is an Asian themed dinner.  Could you bring an appetizer or a dessert?”  I don’t do Asian food.  Not that I don’t like it, or I think I’m too good for it – quite the opposite.  I don’t know about it, where to get the ingredients or how make them into something delicious.  I couldn’t even think of an Asian dessert, so I Googled it, and the simplest, best looking dessert:  Fortune Cookies.

Not that they looked simple to make, but they didn’t involve unavailable or unknown ingredients.  I can’t say I had never thought of making them before.  I had.  And I had wondered how in the world you bake the cookies without the paper getting burned!  Well, now I know.

The dough for the fortune cookie is more like a batter.  My sponge cake skills came in useful when dealing with the egg whites and gently folding in the whole 8 tablespoons of flour.  The recipe in itself was really simple (with only the smallest amounts of the easiest ingredients) and the steps were pretty straight forward.  Until the end.

So I mixed up the batter, no biggie.  Pouring the batter onto the pan reminded me of making pancakes – not too tough.  Moving the pan in a circular motion to form circles was a little trickier.  Lucky for me, my favorite game on the Wii fit uses these same balancing board skills, only in the game you are trying to get the balls in the holes without falling off the board.  In the fortune cookie game you are trying to make identical circles on a pan. 

The recipe said you could make 4 or 5 on a pan…I was scared, so I did only two.  Why was I scared?  Because from the time you take them out of the over, you only have 20 seconds to insert the fortune and fold them into the right shape before they harden and it is too late.  The first one didn’t go so smoothly.  I am great at special reasoning, but I couldn’t fold the hot circle into a fortune cookie.  It was more like…a circle folded into fourths.  Ha ha.  The second one wasn’t much better because I had already used about 14 of my 20 seconds on the first one.  The result of my final 6 seconds…well, I didn’t take a picture of it J 

As the second tray of cookies was baking I pulled up a picture of a fortune cookie and thought it through, imagining myself folding the hot little circle in my hands.  (Closing my eyes and making the motions…that is how I roll.)  The result:  fortune cookies!

These cookies were for a farewell dinner where we were all wishing our friends luck as they head on to Afghanistan for work.  After dinner, we all opened our cookies and shared our hand written notes with the guests of honor.  Homerun!  This will now be my go-to creative impress-your-pants-off party favors.

Experimenting with Israeli Fruit

 
It is part of life in the foreign service, but a part that we haven’t yet experienced.  Our first departure.  Not ours, but our friends.  They were the first friends that we made here and they are moving on to Afghanistan.  I don’t know if it has fully set in that my friends are moving away, but the “normal” reaction to a friend moving away is slightly different.  For one, we knew when we met them that they’d only be around for a year.  Two, they are going to Afghanistan and there is a chance that we could overlap with them there by a month of so next year.  Three, they are also Latin Americanists, so if we all had our way we’d be serving in Latin America in the future (there are many posts there and they all know each other pretty well…so we could likely be neighbors again).  And finally, there were our neighbors in DC!  We didn’t know them then, but they only lived 1 block from us, and there is kind of this general feeling that someday all of us will be living in DC again.

So they are really great people because they are always happy and optimistic.  No one here (besides Paul) has encouraged my cooking and baking as much as Liz because she is so complementary of everything I make.  It may not be amazing or professional, but she thinks it is!  I will also always remember the eloquent soliloquy Liz gave on a long car ride professing her love of all things Israeli.  And so, for one of their final nights here we are having them over for a dinner including our best Israeli dishes.  It will pay homage to Liz’s passion.

Paul is making his delicious hummus – and though the Israeli’s don’t put additional flavors in their hummus (that is an American thing), we are probably going to make it a roasted red pepper hummus.  The red peppers are from Israel…so it is still pretty Israeli.  For dinner Paul is making shakshuka.  Friends and family that have come to visit have had this great dish!  It is a spicy tomato base with poached eggs on top.  We serve it with this great olive or onion bread from the “bread guy” in the market. 

Dessert – that is my specialty.  But I don’t do Israeli desserts.  Primarily because they aren’t good .  But the theme of this dinner is Israeli so I thought I might do a modern (improved) take on an Israeli dessert, or make an American dessert with distinctively Israeli ingredients.  So I went to the market and got two fruits that I’ve never even tasted before.  A challenge!

My safe starting point for dessert is a cheesecake.  I have a great recipe and I happen to have cream cheese, thanks to my recent visit to the States!  (You can buy cream cheese here, it is just $7 or $8 for a 6oz box.)  I’ll not describe the cheesecake process to much except to say that a.) I don’t understand the Israeli dairy isle and I may have used Greek yogurt instead of sour cream, and I forgot to read one VERY important line of the recipe.  Nonetheless, the batter tasted amazing when I cleaned the beater so I’m sure it will taste amazing!  (It is just slightly more golden brown on top.)